Attacking · 6 phases
How To Beat A Diamond
A diamond has no wide midfielders, so its four men stand inside about twenty-two of the pitch’s sixty-eight metres. Put two players in the pockets either side of it and they follow you in, narrowing it to fourteen. Then switch the ball to the far touchline. The diamond has to travel the full width itself, and grass moves faster than legs.
- Phases
- 6
- Original
- 26s
- Updated
- Aug 2026
Swipe to change phase
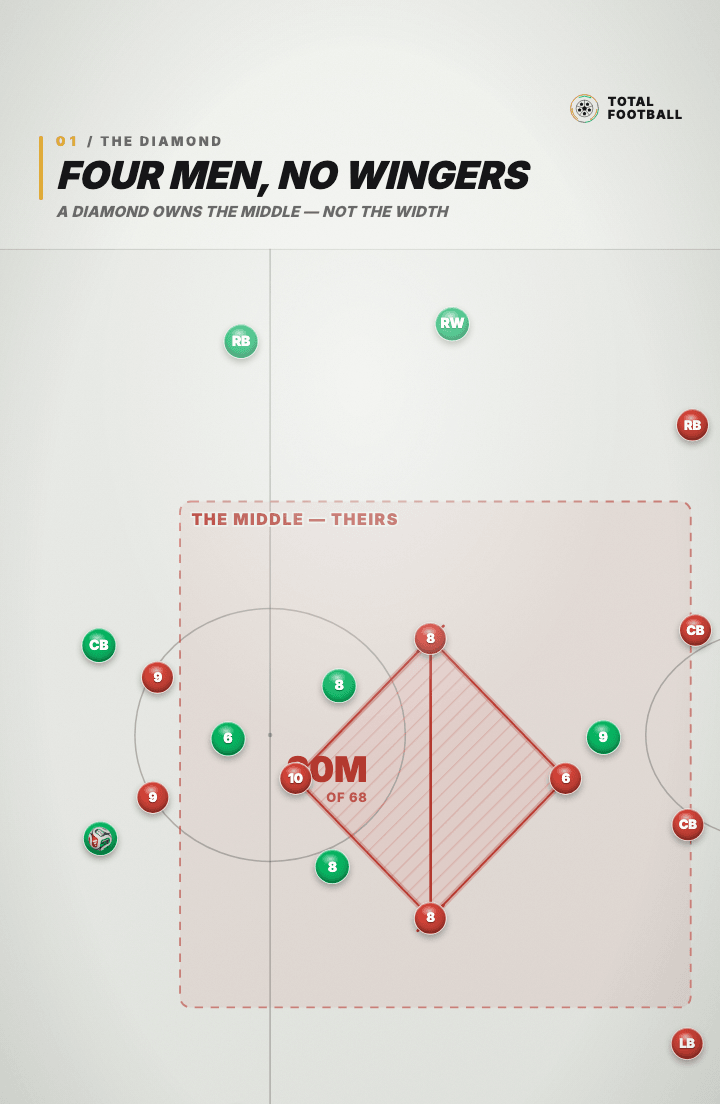
Phase 01 · The diamond drawn as a figure, and the width it actually covers measured through it.
Four men, no wingers
A midfield diamond is a holding midfielder, two shuttlers and a number ten, and the shape they make is drawn here as a technical figure: hatched face, doubled edges, rings at the four corners. It is rebuilt every frame from where the four players actually are, so it deforms as they move rather than being a graphic laid over the top. The dimension line runs straight through it at the shuttlers’ own depth and reads twenty metres of sixty-eight. That is the number the whole system turns on. The zone drawn around it is labelled the middle, theirs, and it is theirs: nobody is going to play through a diamond. What matters is that a diamond has no wide midfielders at all, which means the forty-eight metres that dimension line does not cover belong to nobody.
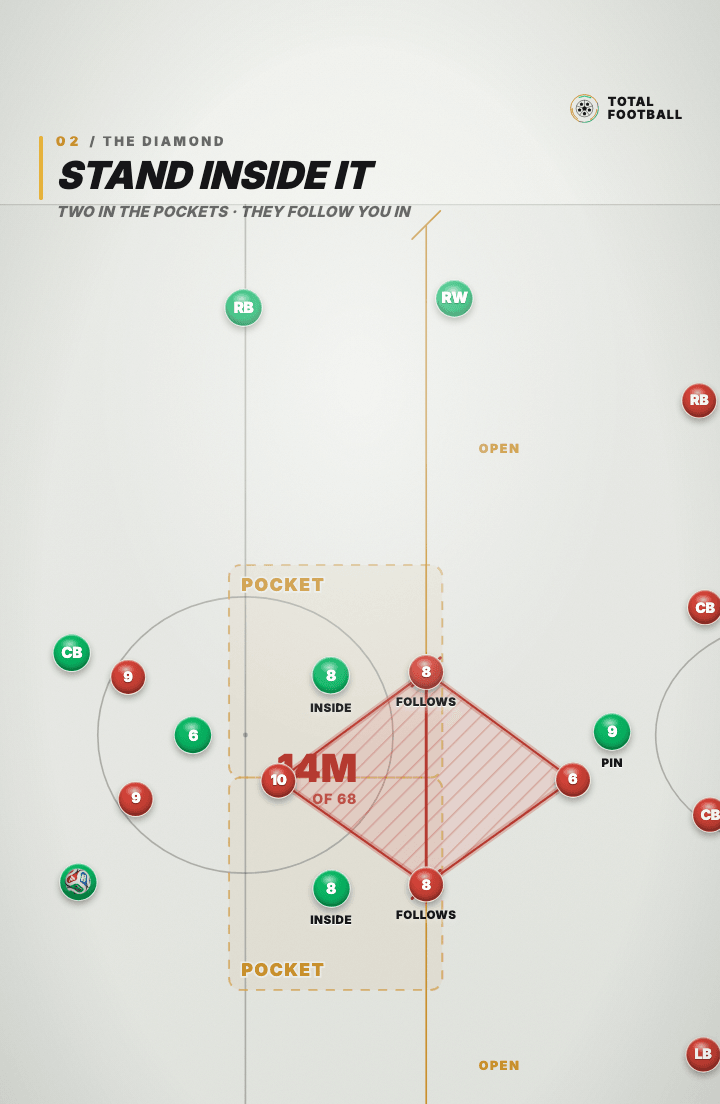
Phase 02 · Two eights take the pockets, the shuttlers follow them in, twenty becomes fourteen.
Stand inside it, and it gets narrower
The first move is not the switch. It is to put two midfielders in the pockets either side of the diamond, marked INSIDE on the board, and simply stand there. The shuttlers cannot ignore a man receiving between their lines, so they come across, and the moment they do, the dimension line drops from twenty metres to fourteen. That is the trap: the diamond’s virtue is that it is compact, and compactness is exactly what you use against it. Meanwhile both wingers are marked PIN and have not moved a step, which is the discipline the pattern needs. The two lanes outside the shape are now labelled OPEN, and they are open in the literal sense that there is nobody in them at all, twenty-seven metres of grass on either side of a four-man midfield.
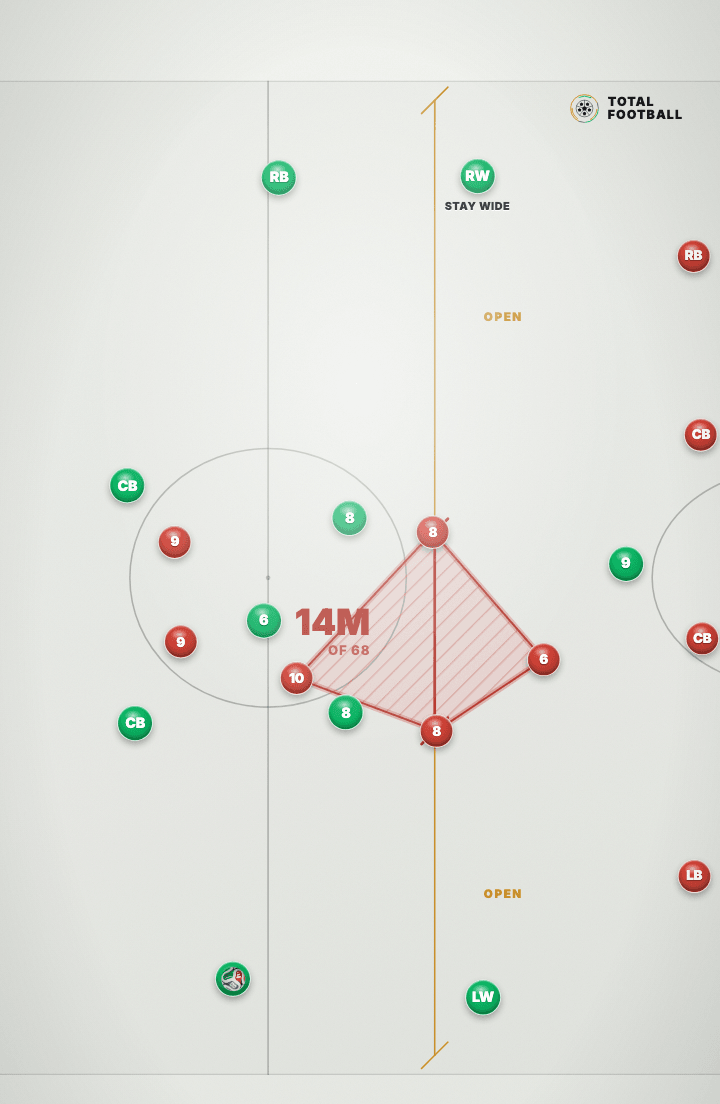
Phase 03 · The ball goes out to the full-back and the whole shape travels, because nobody else can.
Now it has to slide
The ball is played out to the near full-back, and here is the structural problem a diamond cannot solve. A 4-4-2 sends a winger to the ball and keeps its shape. A diamond has no winger to send, so the nearest man it does have is a shuttler already standing in a pocket in the middle of the pitch, and covering the flank means the entire four-man unit travelling sideways with him. The figure on the board visibly slides across, still fourteen metres wide, still hatched, and the far lane is still labelled OPEN because closing it was never an option. The winger on the far side has been standing on the touchline doing nothing this whole time and is marked STAY WIDE. He is about to be the reason the move works.
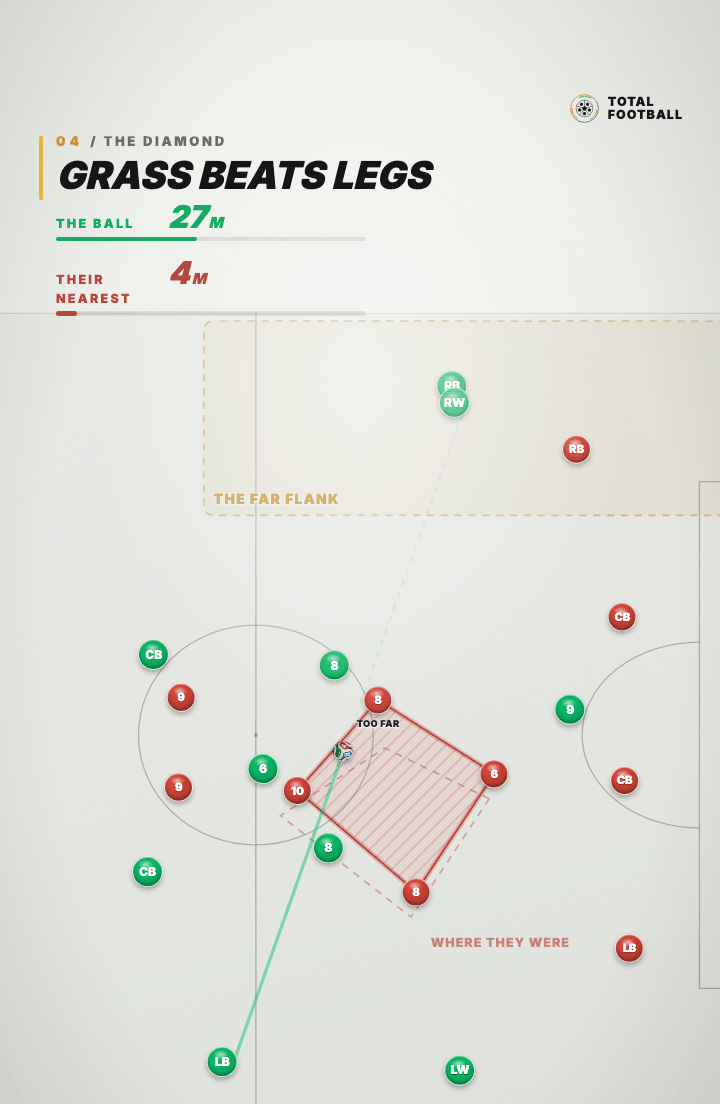
Phase 04 · The switch, caught mid-flight: twenty-seven metres of ball against four of runner.
Grass beats legs
The cross-field pass is released and the board starts two odometers, both integrated live from the same coordinates it is drawing. At this instant the ball has travelled twenty-seven metres and the diamond’s nearest man has covered four. The dashed outline labelled WHERE THEY WERE is the shape frozen at the moment the pass left the boot, held on screen so the live figure can be seen pulling away from its own ghost and still losing the race. This is why the switch is the answer rather than a dribble or a through ball: you are not asking anyone to beat an opponent. You are asking a football to cross fifty-seven metres of pitch faster than four midfielders can, which it does, every time, and the man labelled TOO FAR is the one who was supposed to stop it.
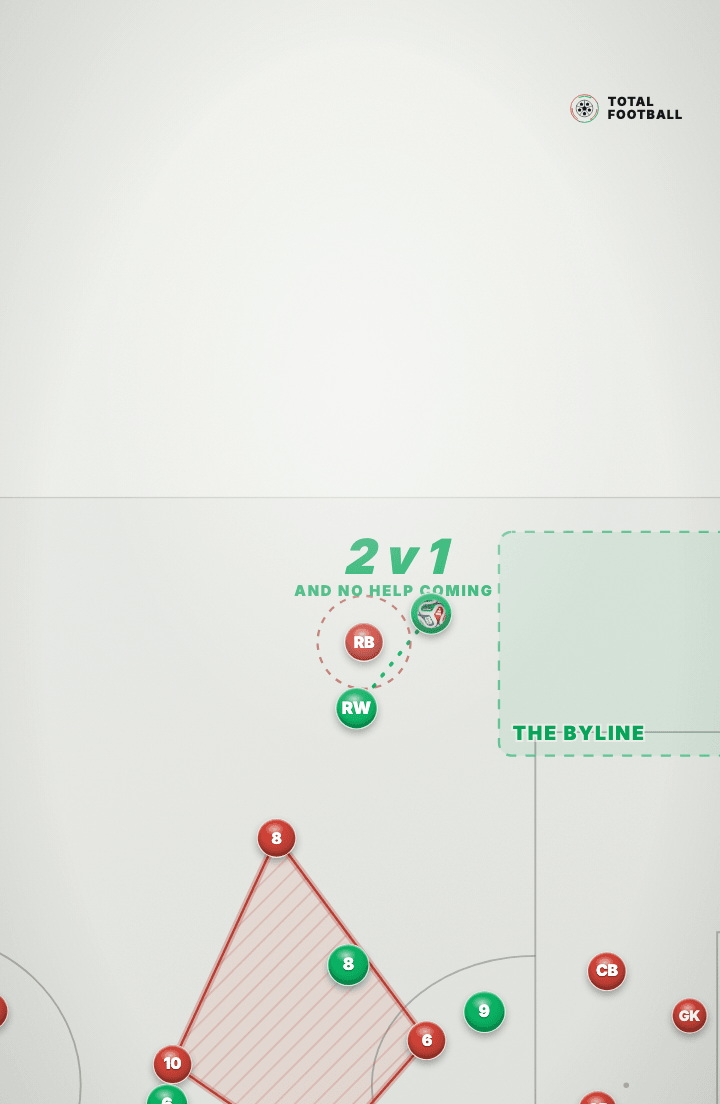
Phase 05 · The ball lands on a winger with his full-back overlapping, against one defender.
Two on one, and no help coming
The ball arrives on the far flank and the picture is the point of everything before it. The winger has it, his own full-back is arriving outside him, and the opposition has exactly one player in the area: their full-back, ringed on the board with the pair of green shirts braced above him. Two against one, and the caption states the part that makes it decisive rather than merely favourable: no help is coming. The four men who would normally cover this are still on the other side of the pitch, forty metres away, because they were made narrow on purpose in phase two and then made to travel in phase three. A diamond does not lose this duel because its full-back is poor. It loses it because there is nobody within four seconds of him.
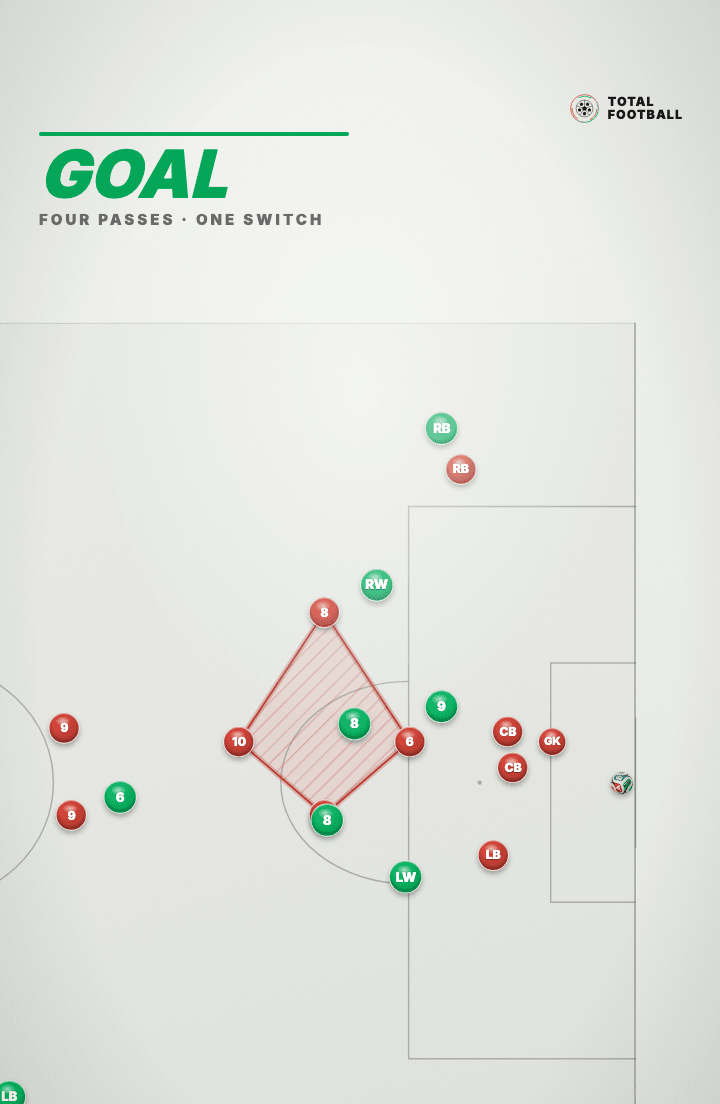
Phase 06 · The cutback is finished, and the diamond is still forty metres away.
Four passes, one switch
The overlap reaches the byline, cuts the ball back, and it is finished first time. Count what it took: four passes, one of them a switch, and no player beating another player at any point. Then look at where the diamond is in this frame. It is still drawn, still hatched, still a perfectly good compact shape, sitting forty metres from the ball on the wrong side of the pitch. That is the honest verdict on the system. A diamond wins the middle of the pitch, and the middle of the pitch is only worth winning if the opposition agrees to play there. Make it narrow, then go round it.
The principles
- 01
A diamond is not a compact shape, it is a narrow one. Narrow is a decision you can punish.
- 02
Stand in the pockets first. Making it narrower is what makes the switch worth playing.
- 03
The ball crosses fifty-seven metres while their nearest man covers four. That is the whole idea.
What is the weakness of a midfield diamond?
Width. It has no wide midfielders at all, so its four men occupy about twenty-two of the pitch’s sixty-eight metres and everything outside that band has to be covered by somebody travelling to it.
Why stand in the pockets before switching the ball?
Because standing there makes the diamond narrower still. The shuttlers follow you inside and twenty-two metres becomes about fourteen. Narrowing it first is what turns the switch from a nice pass into a decisive one.
How do you actually punish a diamond once it is narrow?
Switch to the far touchline. The ball crosses fifty-seven metres in the time their nearest man covers four, so it arrives on a winger with his full-back overlapping against one defender, and no help is coming.
Next
Get the next one.
One system a week, drawn and explained the same way.