Defending · 6 phases
How Spain Caged France
You stop giving them the ball. A counter-attack needs a turnover, so the first rule is to keep possession and never hand one over. The second is to hold your two banks close enough that nothing can be received between them. The third is to put two players on the winger every time, so nobody ever gets a one-against-one. Sprung once, their fastest player just runs into a crowd.
- Phases
- 6
- Original
- 47s
- Updated
- Aug 2026
Swipe to change phase
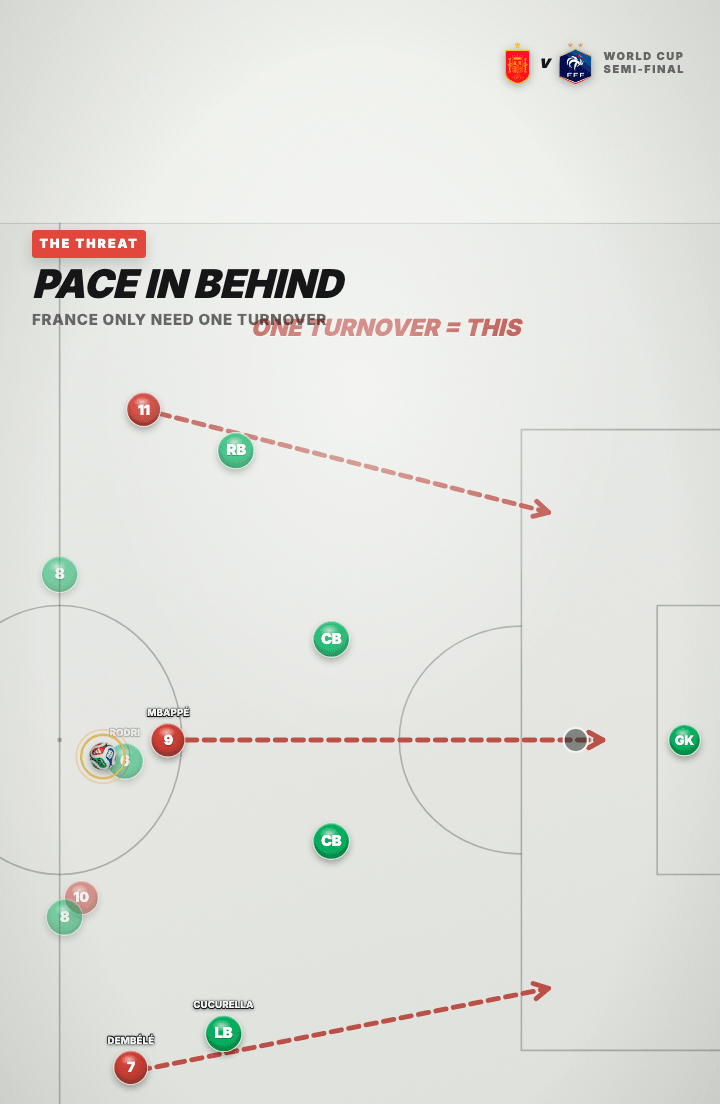
Phase 01 · Drawn before it can happen: three runs, one pass, and the game is gone.
One turnover is all they need
Start with what you are actually defending against, played out as a hypothetical rather than a real ball. The three red arrows are the runs that arrive the instant possession is lost: one straight down the middle, two into the channels either side. The ghosted ball rolling into the space behind the green line is the pass that finds them, and it is one pass, not a build-up. This is why defending a counter-attacking side is not a matter of defending harder. By the time this picture exists you have already lost it, and no amount of tracking back covers fifty metres of grass against forwards who were moving before you were. Everything that follows is an attempt to make sure this frame never happens.
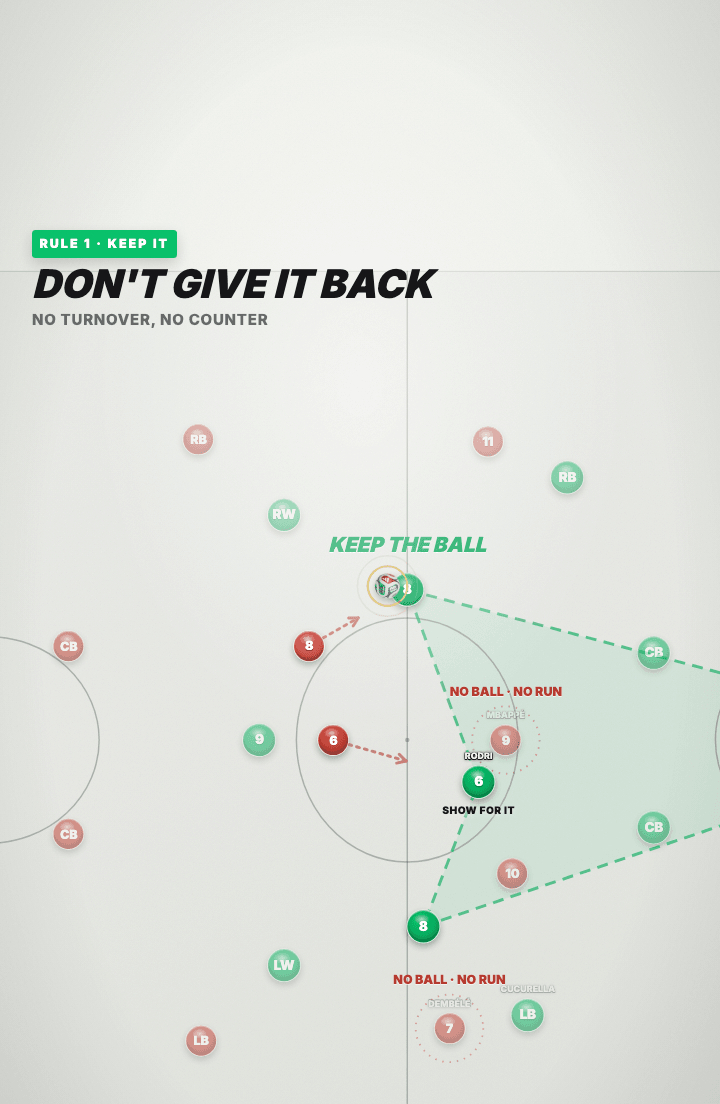
Phase 02 · The ball circulates through the pivot; the runners have nothing to run onto.
Rule one: do not give it back
The first rule is the one nobody thinks of as defending. Keep the ball. The green circulation ring runs through the holding midfielder and the two eights, the pivot is marked SHOW FOR IT, and the ball goes round rather than forward because forward is not the point. On the other side of the board the two players the whole plan is built around are marked NO BALL · NO RUN, greyed out and standing still. A forward whose entire value is what he does with fifty metres of space in front of him is worth nothing at all while the opposition has the ball at its own centre-back. This is possession used as a defensive act, and it is the cheapest of the three rules to execute and the one most often skipped.
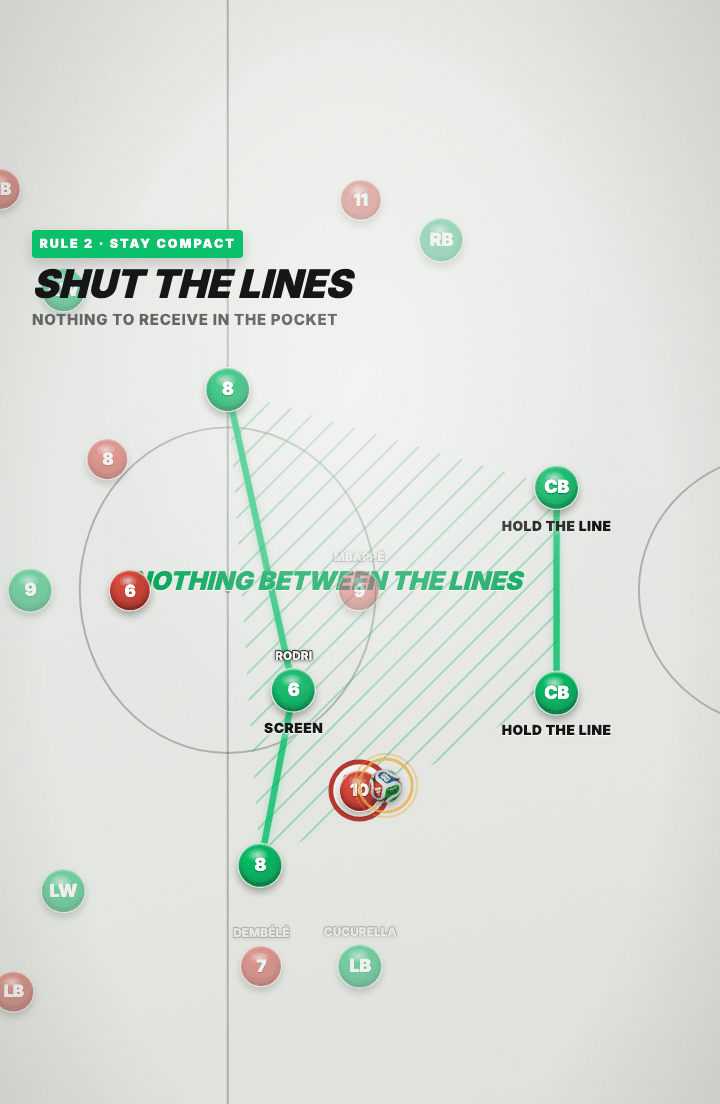
Phase 03 · Two banks held close, and the pocket between them hatched shut.
Rule two: shut the lines
Eventually the opposition gets the ball, and the ten does the obvious thing: he drops into the pocket between the midfield and the defence to receive and turn. The board draws the two banks as solid green rails with the corridor between them hatched over and stamped NOTHING BETWEEN THE LINES. Both centre-backs are marked HOLD THE LINE, which is the instruction that makes it work: the temptation when a ten drops in is to follow him, and following him is what opens the very gap he was looking for. The holding midfielder is marked SCREEN and does the actual work. The receiver gets the ball with his back to goal, no forward option and no room to turn, so he plays it backwards. That is a successful defensive action and nobody made a tackle.
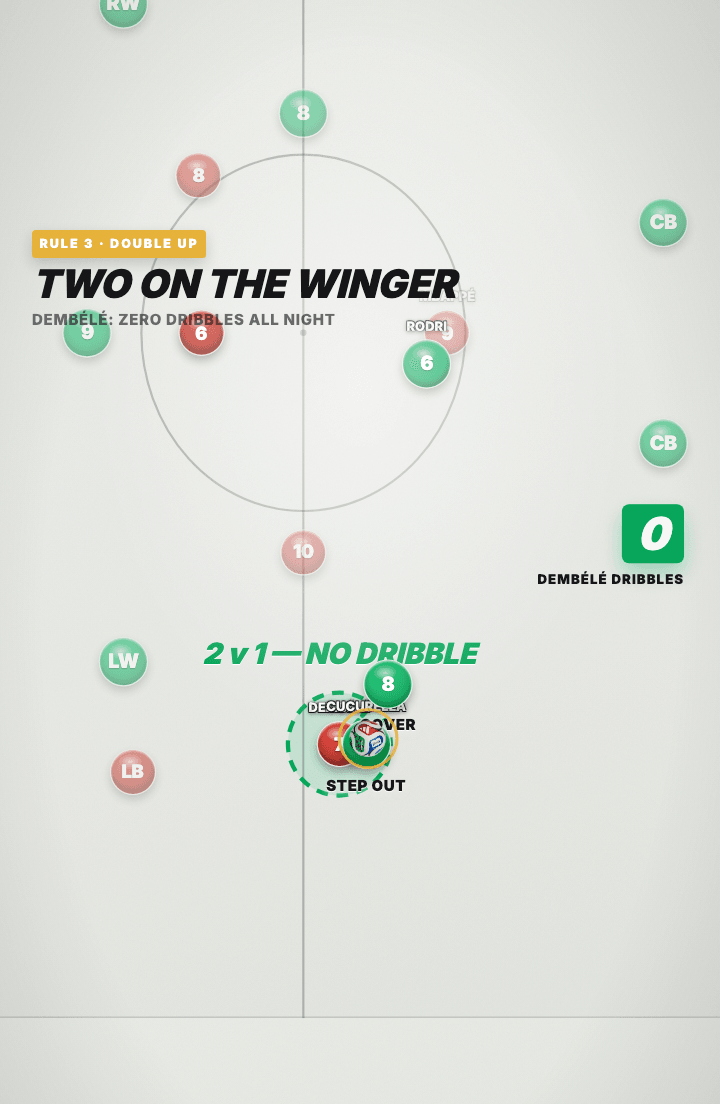
Phase 04 · The ball goes wide and two shirts arrive together, so the duel never happens.
Rule three: two on the winger
The ball is worked out to the winger, which is where a team with this attack expects to win the game. Two green players arrive on him at once: the full-back steps out, marked STEP OUT, and the midfielder tucks across to cover, marked COVER. The board calls it what it is, two against one and no dribble, and the counter that matters sits beside it reading zero. Doubling a winger looks wasteful, because it commits two players to one opponent and leaves someone free elsewhere. It is worth it anyway. A one-against-one on the flank against a genuinely elite dribbler is close to a coin flip; a two-against-one is not a duel at all, and the price of losing that coin flip is a shot at goal.
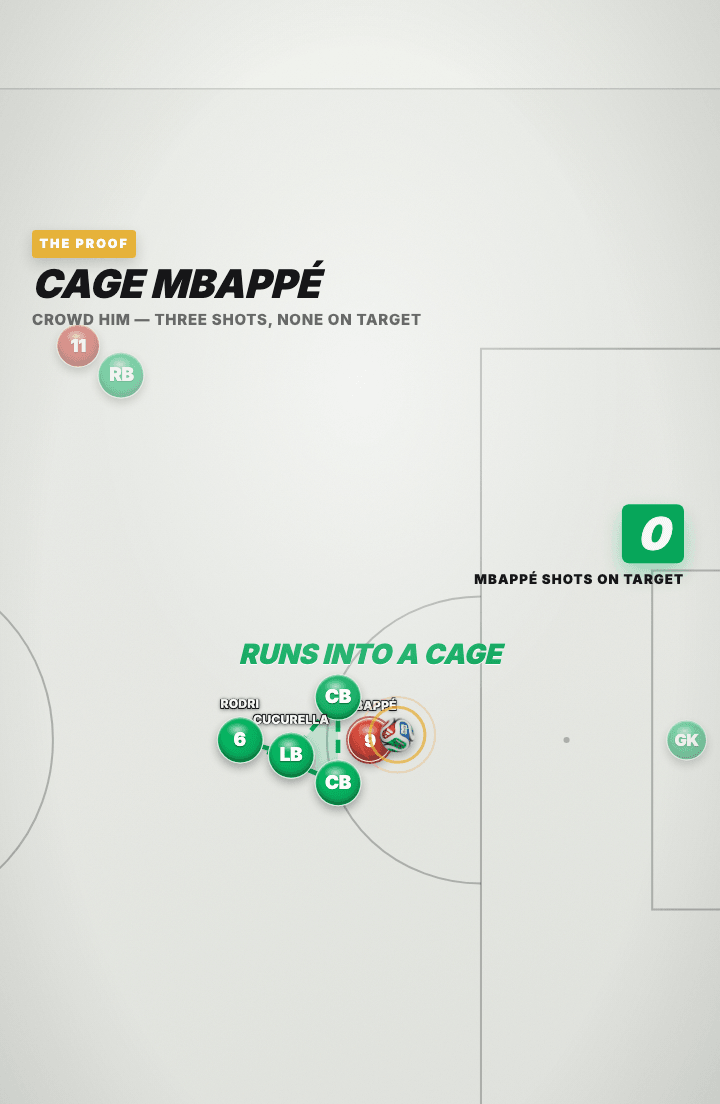
Phase 05 · The vertical ball finally goes; the runner arrives into four defenders.
The proof: spring him, and see
Now the ball everyone has been waiting for. It is played vertically into the striker running in behind, the single pass the entire defensive plan exists to prevent, and it gets through. Watch what he arrives into. Both centre-backs collapse in front of him, the holding midfielder folds back on top of him, and the full-back who was doubling the winger on the far side is sprinting into the middle. The polygon shrinking around him is drawn from those four positions, so it tightens frame by frame as they close. He receives it, and there is no shot, because a shot needs a metre of space and there is not one. The stat chip beside the picture is the summary of the night: zero on target.
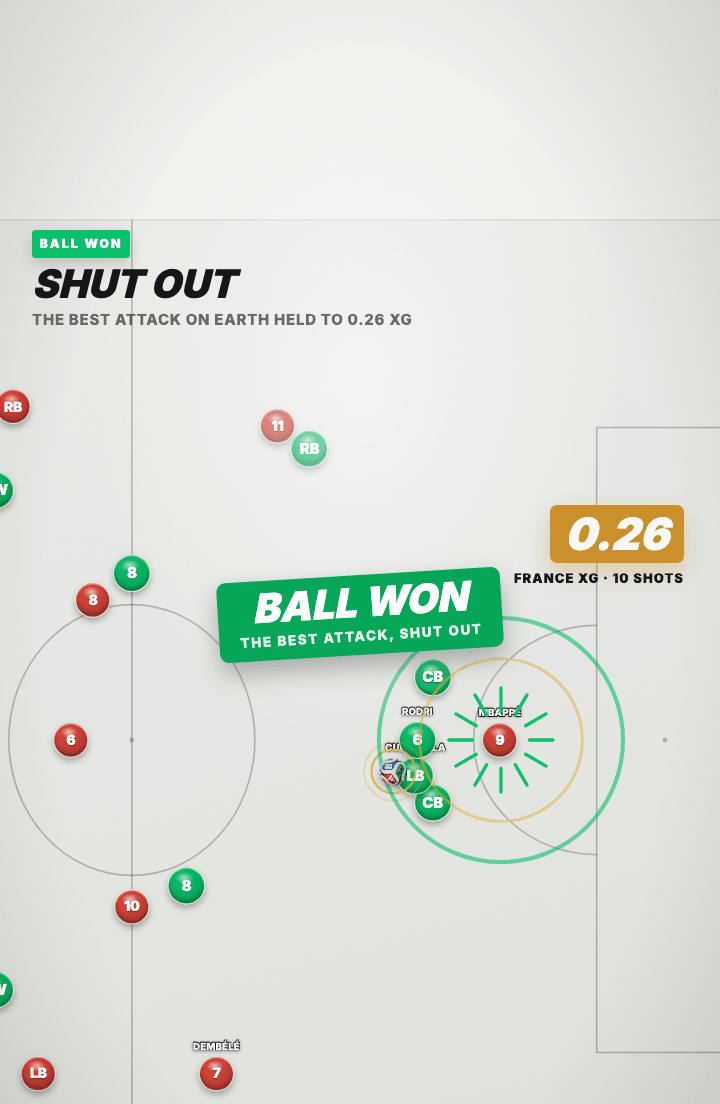
Phase 06 · The ball is won in the crowd, and the night ends at 0.26 xG.
The tackle is the goal
The recovering full-back takes the ball off him and the board stamps it BALL WON, which in a defensive clinic is the equivalent of a net rippling. The number in the corner is the honest verdict on the whole method: 0.26 expected goals from ten shots, against an attack that spends the rest of the tournament scoring at will. Read the three rules backwards and they are all the same rule. Keep the ball so there is no turnover. Shut the lines so there is nothing to receive. Double the winger so there is no one-against-one. None of them is about being braver or quicker than the player you are facing. They are about arranging the game so that his best quality never gets a situation to happen in.
The principles
- 01
The best defence against pace is possession. A turnover is the only ball they can run onto.
- 02
Compact means the gap between your banks, not how deep you sit. Nothing receives in between.
- 03
Never allow a one-against-one on the flank. Two shirts every time, even when it looks excessive.
How do you stop a team that counter-attacks with pace?
Three rules, in this order. Keep the ball, because a turnover is the only ball their runners can run onto. Hold your two banks close enough that nothing can be received between them. And put two players on the winger every time, so the one-against-one never happens.
Does defending compact mean sitting deep?
No. Compact is the distance between your own two banks, not how far from your goal they stand. A deep line with a large gap in front of it is not compact; a mid-block with nothing receivable between the lines is.
Why double up on the winger every single time?
Because a one-against-one against genuine pace is a coin flip, and it is a coin flip you never have to accept. Two shirts arriving together means the duel does not take place. It looks excessive until the one time nobody goes across.
Next
Get the next one.
One system a week, drawn and explained the same way.